Purchasing & Receiving
Who this is for
Warehouse team and anyone placing supplier orders. You'll use this when a shipment arrives from a vendor.
What you'll accomplish: turn a purchase order into received inventory. Every IMEI gets recorded, the PO closes, and the inventory GL entry posts automatically.
Before you start: you need a confirmed purchase order in Odoo with device product lines. If the PO hasn't been created yet, ask whoever handles purchasing to create it first.
The flow
Uploading the IMEI file is optional — you can also just scan devices directly as they arrive. Most warehouses do both: upload the vendor's file if they sent one, then scan to verify.
Use the right intake path
For normal supplier shipments, use the PO + IMEI Manifest flow on this page. Use Device Intake only for one-off company-owned devices that are not tied to a supplier PO or vendor manifest. Device Intake creates inventory immediately, but it does not create a PO, receiving manifest, vendor bill, or consignment agreement.
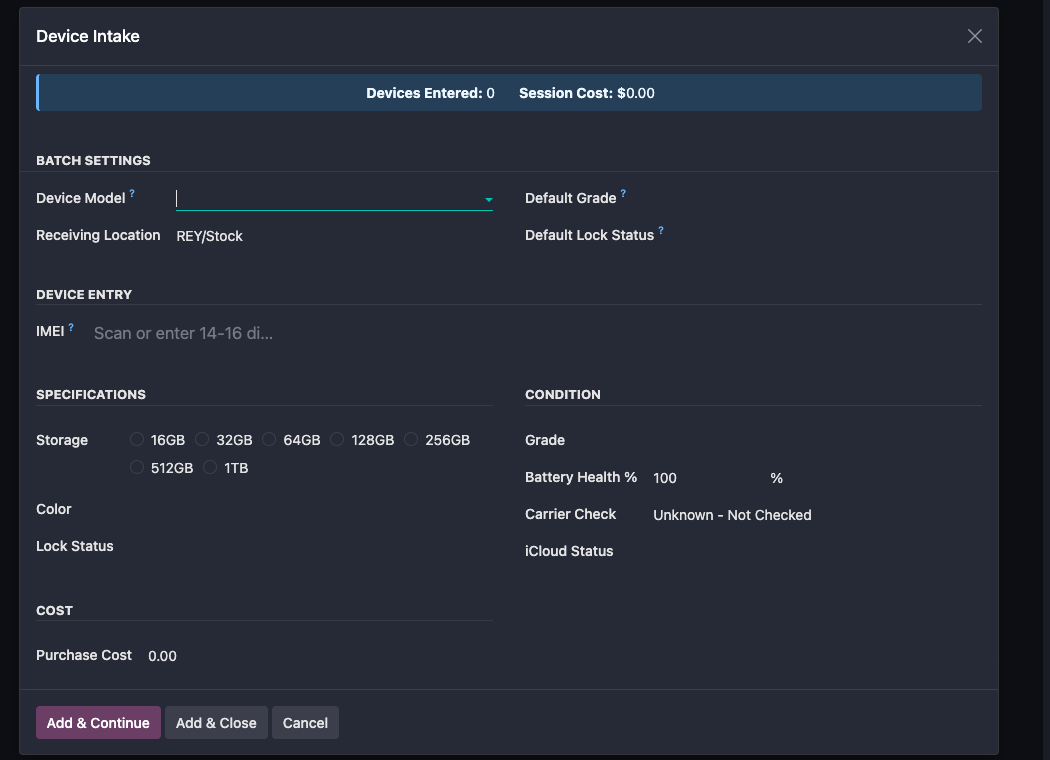
Manual one-off intake — Device Intake
Use Inventory → Device Inventory → Device Intake when you need to add a small number of devices directly, for example a trade-in, replacement unit, or internal test phone.
When to use it
Use this path when all of these are true:
- The device belongs to the current company.
- There is no purchase order or vendor IMEI file to receive against.
- You are adding a small number of devices, not a supplier shipment.
Do not use Device Intake for Axis consignment batches unless an admin has explicitly approved that process. Manual intake defaults ownership to the current company; consigned inventory should normally enter through the controlled PO/manifest/consignment flow.
How to enter a device
- Set the Device Model and Receiving Location in Batch Settings.
- Optionally set Default Grade and Default Lock Status if you are entering a batch with shared defaults.
- Scan or enter the IMEI.
- Fill storage, color, grade, lock status, battery health, carrier/iCloud status, and purchase cost.
- Click Add & Continue for the next device, or Add & Close for the last one.
Each saved device creates a stock.lot, adds one on-hand unit at the receiving location, records a stock move from Supplier to that location, and writes movement history. The wizard rejects duplicate IMEIs so the same device cannot be added twice.
After intake, send the device through the same QC process as any other received device before sales allocation.
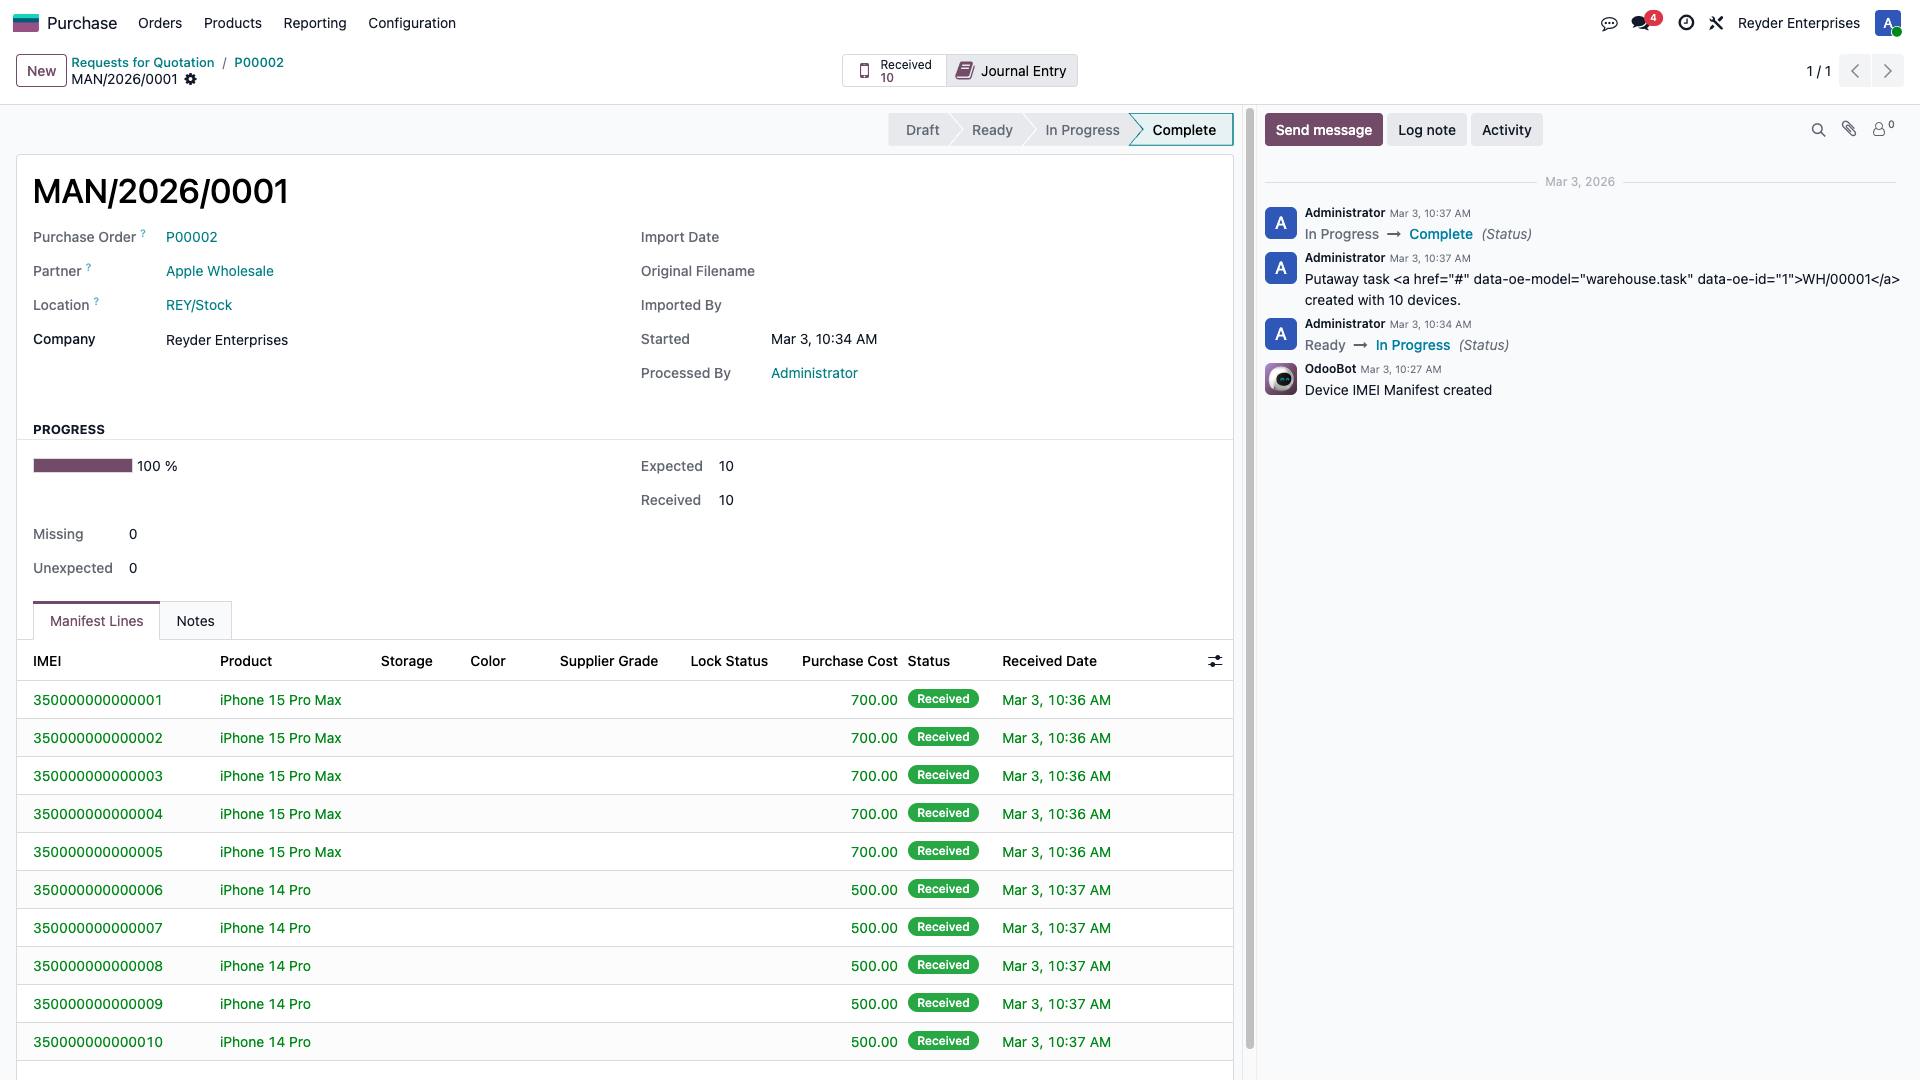
Step 1 — Open the purchase order
From the home, click Purchase → Orders. Open the order that matches today's shipment.
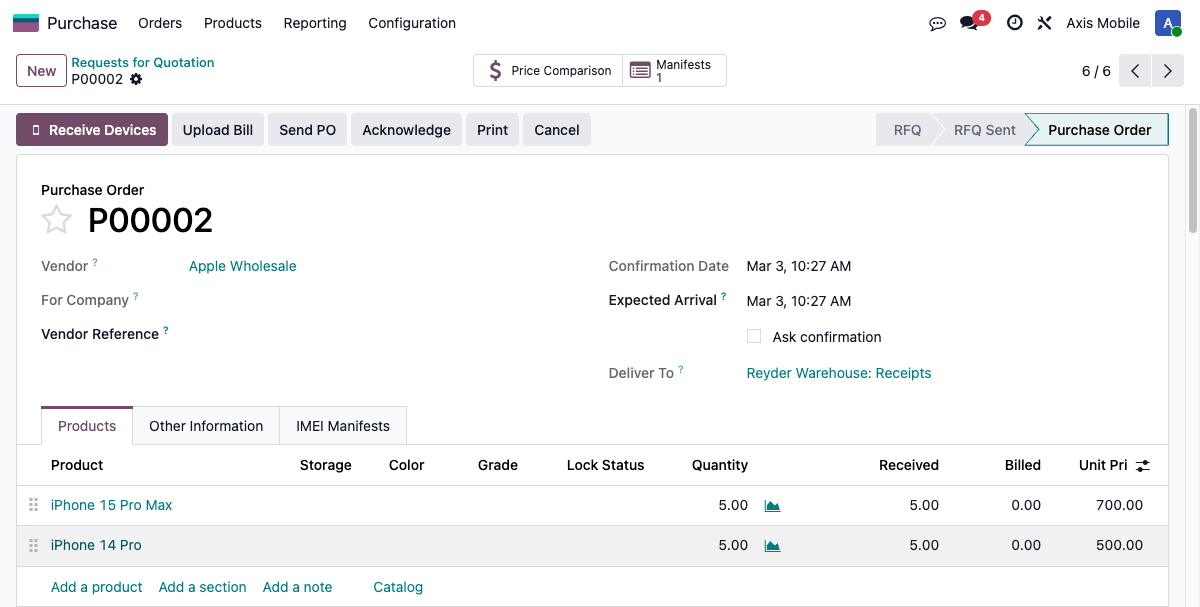
Each line on the PO defines what you expect to receive: product, storage, color, grade, quantity, unit price. That line becomes the "expected" count in the receiving manifest.
If the PO is still a draft, click Confirm Order at the top. That does two things:
- Status moves to Purchase Order
- A receiving manifest is auto-created for the shipment
Step 2 — Open the receiving manifest
On the confirmed PO, click the Manifests smart button in the header. This takes you to the manifest that was auto-created.
The manifest starts in Awaiting Upload. You have two ways to populate it with IMEIs:
- Upload the vendor's IMEI file (CSV or Excel) — fastest if they sent one
- Scan each device with the barcode gun — works if there's no file, or to verify after uploading
You can do both. Scanning checks each IMEI against what was uploaded.
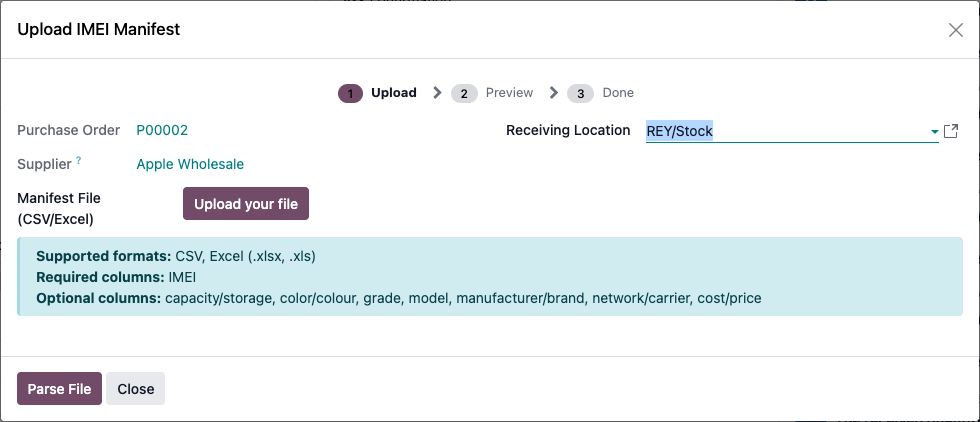
Step 3 (optional) — Upload the vendor's IMEI file
On the manifest form, click Upload CSV. Pick the file, preview the column mapping, and confirm.
The wizard creates one line on the manifest per IMEI in the file. Lines show up in one of two origin types:
- Expected — IMEI matched a line on the PO
- Extra — IMEI wasn't on the PO (vendor sent something not ordered, or the PO qty was lower than the file)
Extras aren't errors — they're just flagged so you know.
File format
CSV or Excel. IMEI is the only required column. Everything else is optional and mapped at upload:
| Column | Required | What it does |
|---|---|---|
IMEI |
yes | 15-digit device ID |
storage |
no | e.g. 128, 256, 1tb |
color |
no | e.g. Midnight, Silver |
grade |
no | Excellent / Good / Fair / Poor |
lock_status |
no | e.g. Unlocked, Locked |
purchase_cost |
no | Per-unit cost — used for the inventory GL entry if set |
supplier_sku |
no | Vendor's internal SKU (for reference) |
supplier_grade |
no | Vendor's grading scheme (for reference) |
supplier_carton_id |
no | Vendor's carton/pallet ID (for reference) |
Step 4 — Scan devices into the manifest
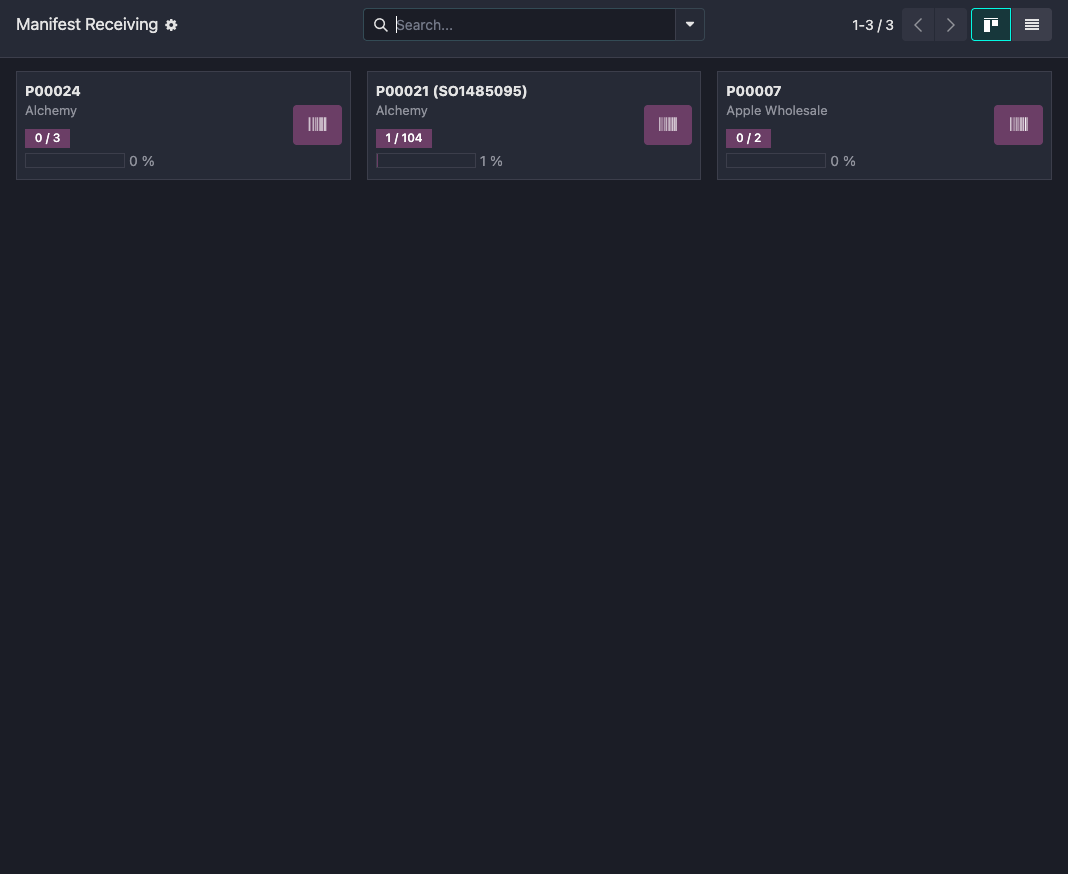
Click Start Manual Receiving on an empty manifest, or Continue Receiving after a CSV upload or partial receiving session. You can also open the Barcode app → Manifest Receiving and choose the manifest card. Scan each device's IMEI.
If you are working from the Barcode app instead of the manifest form, open Manifest Receiving and choose the card for the PO you are unloading:
Each scan:
- Creates the device record (the IMEI becomes a
stock.lot) - Puts it at the Receiving location
- Flips the manifest line's status from
ExpectedtoReceived - Ticks the progress bar up
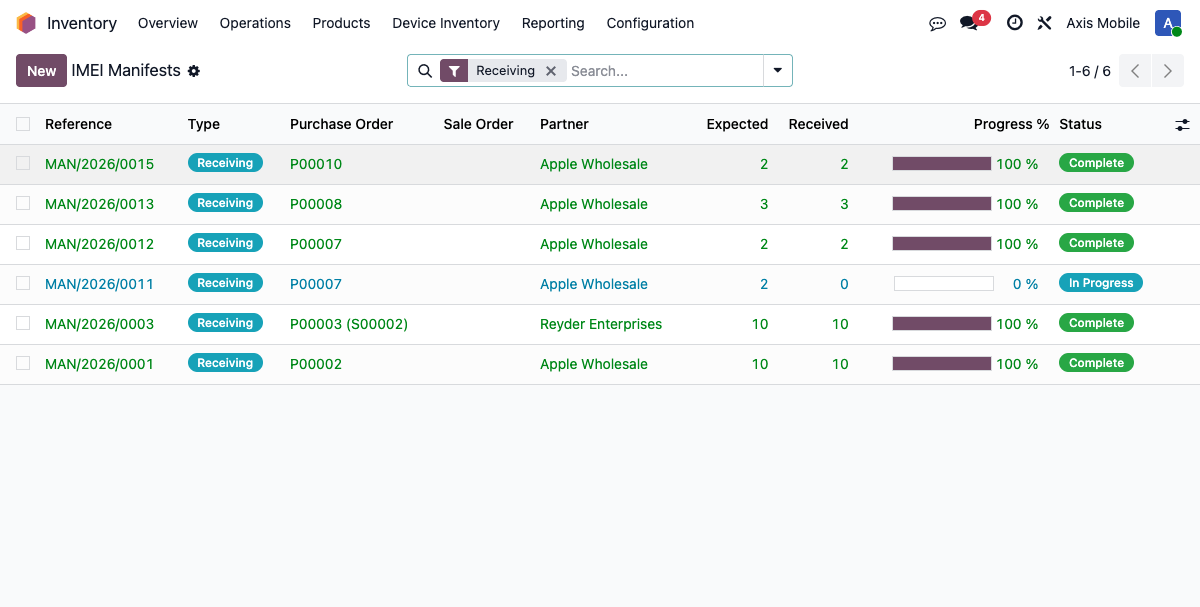
The full list of incoming manifests looks like this — progress bar and status make it obvious which ones need attention:
If you scan an IMEI that's not on the manifest
The scan still succeeds — the system adds a new manifest line flagged as an unexpected device. You'll see it show up in the Extras. This is on purpose: vendors occasionally throw in extras, and you want them tracked, not rejected.
If you scan the same IMEI twice
Second scan gets rejected with an error — IMEIs are unique. If the first scan was a mistake, correct it before rescanning.
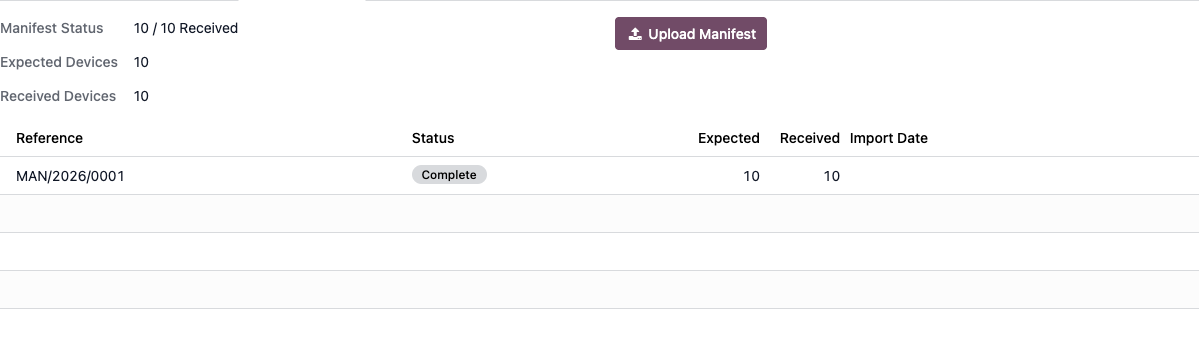
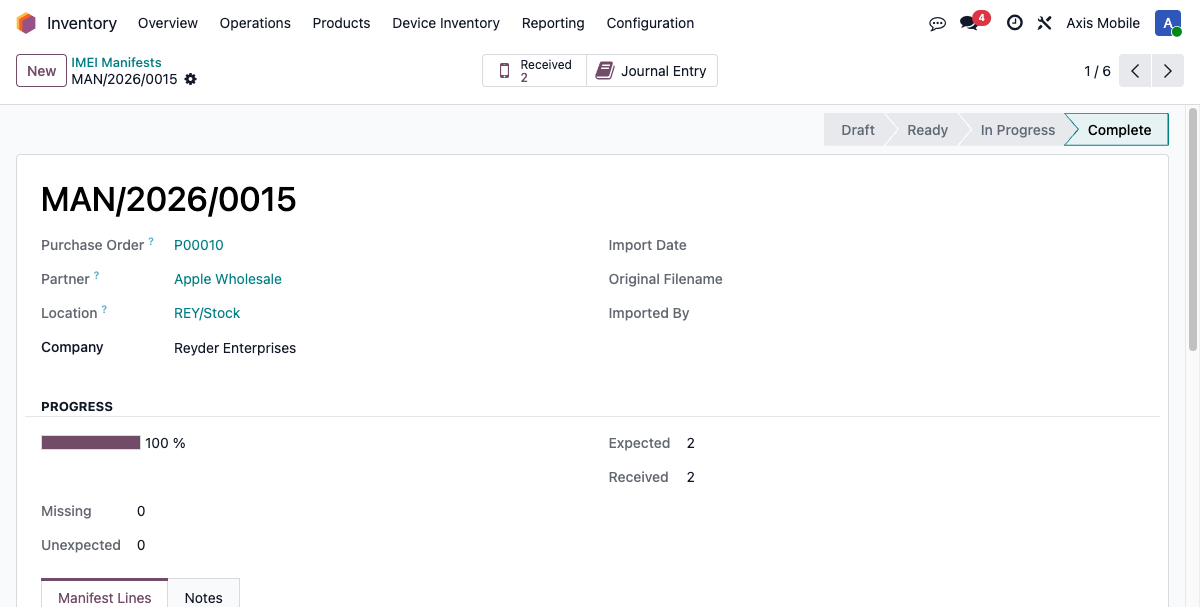
Step 5 — Mark the manifest complete
When the progress bar hits 100% (or you've accounted for any shortage), click Mark Complete at the top of the manifest.
What happens when you click:
- The inventory GL entry posts (DR Valuation / CR GRNI — see below).
- A putaway task is created for the warehouse team to move devices to their shelf homes.
- Manifest state moves to Done.
- Devices become visible to QC.
That's the receiving done. The devices are now your inventory.
Accounting entry that posts
The moment the manifest completes, this journal entry is posted to the Device Stock Journal:
| Account | DR | CR |
|---|---|---|
| Device Valuation (asset) | sum of purchase_cost |
|
| Device Stock Input / GRNI (liability) | sum of purchase_cost |
Amount is the sum across all received lines, including any extras. The GRNI entry clears later when the supplier bill is posted and matched to the PO — that's standard Odoo three-way-match behavior.
Both accounts are configured per-company under Settings → Inventory → Device Inventory.
For a deeper look
The complete list of GL entries this module posts (receiving, COGS, customer invoice, settlement, inter-company) is in Accounting Reference.
Common problems
The manifest won't let me mark it complete
You still have lines in Expected status. Either scan them in, or — if the devices truly didn't arrive — edit each line and set it to Missing. The manifest will then complete with those lines flagged as shortage.
The IMEI my scanner read isn't accepted
Two likely causes: (a) that IMEI already exists as a device in the system (someone scanned it in before, maybe on a different PO). Search All Devices for the IMEI to confirm. (b) The barcode on the box is a carton-level code, not the device IMEI. Flip the phone and scan the IMEI printed on the back or in the device's About screen.
Progress shows 0% even after I scanned
Refresh the page. The progress bar updates live during scanning in the Barcode app, but if you opened the manifest in a separate tab, it won't see those scans until you reload.
Vendor's file is in a weird format
The upload wizard shows a column-mapping preview before import — you can map the vendor's columns to the expected names on that screen. IMEI is the only required column; everything else is optional.
Should I use Device Intake instead of a manifest?
Usually no. If there is a supplier shipment, PO, consignment batch, or vendor-provided IMEI list, use the manifest flow. Use Device Intake only for one-off company-owned devices where no upstream purchasing document should exist.
Under the hood
Technical details for developers
Models touched
device.manifestwithmanifest_type='receiving'device.manifest.line— one per IMEI, withorigin_typeinpo_expected,csv_matched,csv_new,barcode_matched,barcode_unexpectedstock.lot— created during scan withqc_status='pending_qc'and location set to the receiving warehousestock.quant— created by the stock.move that accompanies the lotaccount.move— inventory GL entry posted onaction_mark_complete()
Scan locking
Each scan acquires a Postgres advisory lock (pg_try_advisory_xact_lock) keyed off the IMEI hash. This prevents two warehouse staff from successfully scanning the same IMEI concurrently — the second scanner gets a clear error rather than a silent duplicate.
Manifest state machine
draft → awaiting_upload → uploaded → in_progress → done
Key fields
device.manifest.state,received_count,expected_count,account_move_iddevice.manifest.line.status(expected/received/missing),stock_lot_id,purchase_costpurchase.order.manifest_ids,purchase.order.manifest_status
Order of operations on Mark Complete
action_mark_complete() runs:
_create_inventory_accounting_entry()— posts the GL move_create_putaway_task()— createswarehouse.taskfor shelf assignmentstate = 'done'