Workflow Map
Use this page to understand where each person, document, and automatic handoff belongs. It is a map—not a substitute for the detailed task guides.
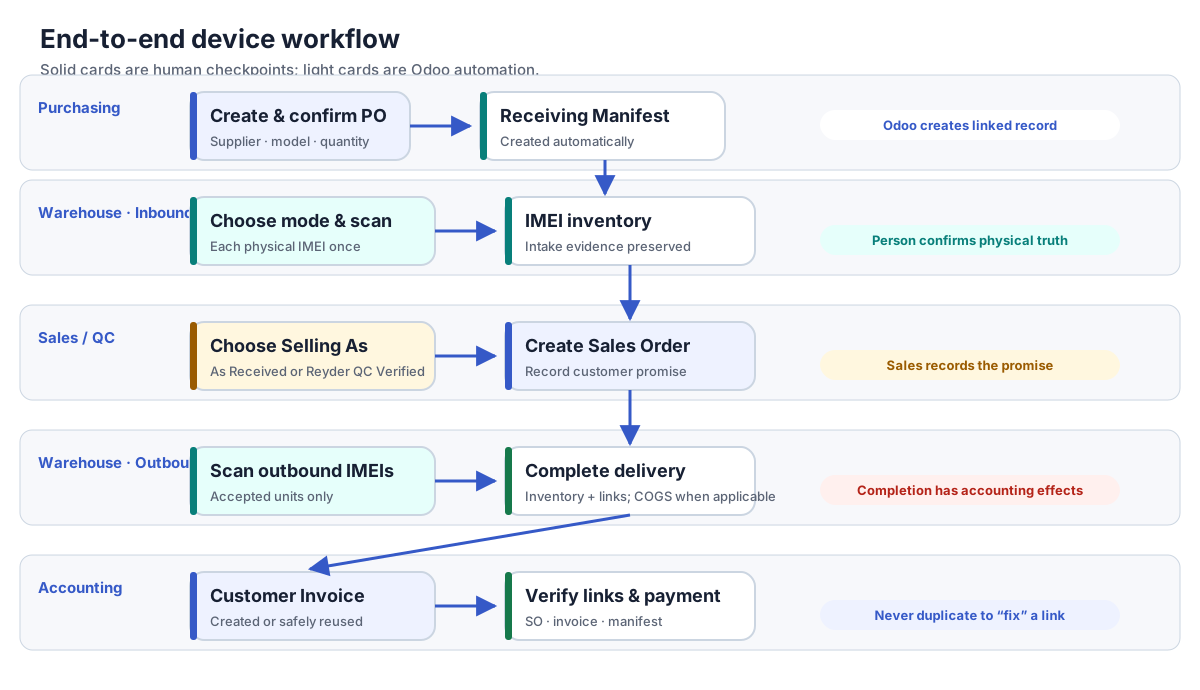
One process, six records
| Record | Created from | Business question it answers |
|---|---|---|
| Purchase Order (PO) | Purchasing | What did Reyder order from the supplier? |
| Receiving Manifest | Confirmed device PO | Which exact IMEIs physically arrived? |
| Inventory Device / IMEI | Accepted receiving scan | What is known about this exact physical phone? |
| Sales Order (SO) | Sales or invoice-first automation | What did Reyder promise the customer? |
| Delivery Manifest | Confirmed device SO | Which exact inventory IMEIs are leaving? |
| Customer Invoice | SO fulfillment or invoice-first workflow | What was the customer billed, and has it been paid? |
The links are directional. A supplier IMEI file can populate a Receiving Manifest, but it is not an Odoo inventory receipt. A sales order can create a Delivery Manifest, but the phones are not sold until the outbound flow completes.
Human actions and automatic actions
| Stage | Person does | Odoo does automatically |
|---|---|---|
| Purchase | Enters and confirms the PO | Creates the Receiving Manifest for an outside-supplier PO; an inter-company buyer PO waits for the source delivery handoff |
| Receive | Chooses the correct scan mode and scans physical IMEIs | Creates inventory IMEI records and intake provenance |
| Condition | Chooses As Received or performs real Reyder QC | Preserves intake and verified results separately |
| Sell | Enters the customer promise on the SO | Creates/reopens the Delivery Manifest when scanning starts |
| Fulfill | Scans the physical IMEIs leaving and confirms completion | Allocates exact units, marks them sold, posts COGS when configured and the delivered value is non-zero, and creates/reuses linked billing |
| Account | Reviews payment and linked documents | Keeps SO, invoice, manifest, and IMEI references connected |
The four control points
1. Before receiving
Decide whether an exact supplier IMEI list exists. This decision controls the scanner:
- known exact list → verify that list;
- no list → receive by PO row.
For an inter-company buyer PO, use neither branch: wait for the source company to complete delivery, then verify the exact handoff Odoo loads automatically.
See Single Scan vs. Batch Scan.
2. Before selling
Decide whose condition claim is being sold:
- supplier/PO claim → As Received;
- Reyder's tested result → Reyder QC Verified.
See Quality Control & Selling As.
3. Before outbound scanning
Check the sales order describes only what was promised. Optional blank fields are not errors; they mean Any / not promised.
See Sales Orders.
4. Before delivery completion
The physical phones, accepted scan count, and order quantities must agree. Completion has inventory and accounting effects.
See Delivery Manifests.
Choose or create the invoice before fulfillment
For every external device SO:
- create and review the SO;
- click Confirm;
- link one of the customer's unlinked invoices or click Create New Invoice;
- post and fully pay the linked invoice; and
- scan and complete delivery.
If a new prepaid transaction starts from the invoice with no SO, use New Prepaid Device Invoice. A direct invoice created outside either path is a rescue case: do not manually build a second SO; use Create Linked IMEI Fulfillment once.
See Sales Order & Invoice Linkage.
Where to stop
Stop instead of improvising when:
- the wrong company is active;
- an exact-list shipment contains an IMEI that is not on the list;
- the customer promise differs from the sales row;
- a red outbound scan appears;
- the invoice and SO cannot be opened from each other; or
- the physical count differs from Odoo.
Use Troubleshooting and provide the PO/SO/invoice reference plus the exact message.