Odoo Basics — Learn the Screen Before the Workflow
New to Odoo? Start here (5–10 minutes)
This lesson teaches the few screen habits used in every Reyder workflow. Practice in the training database before touching a live PO, SO, invoice, or IMEI.
| Who | Every new warehouse, sales, QC, and accounting user |
| Have ready | Your own Odoo login and the name of the company you should work in |
| Success | You can identify the company, record, state, linked documents, safe next action, and history |
| Stop if | The company or record reference is wrong, or the screen asks for a permission you were not assigned |
1 — Read an Odoo record from top to bottom
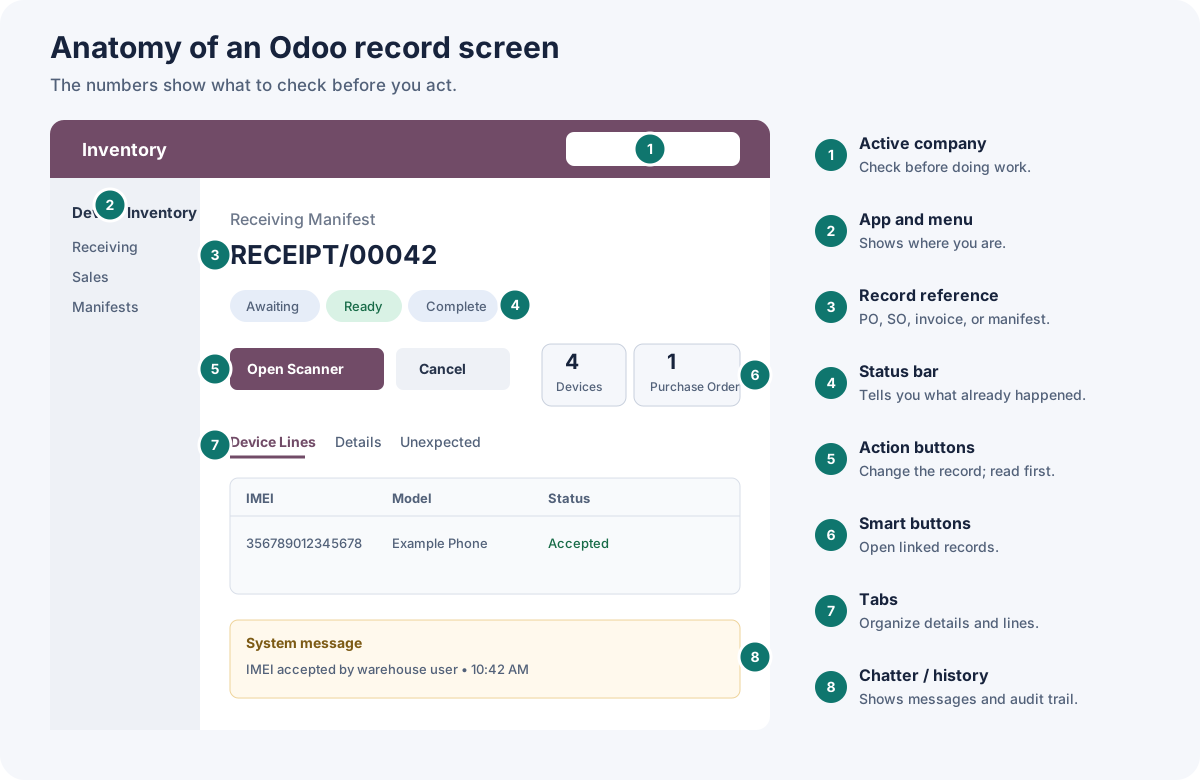
- Active company — check this first. Reyder-only work must not be entered under Axis, and Axis-only work must not be entered under Reyder.
- App and menu — tell you where you are. For device work, the main areas are Purchase, Sales, Invoicing, and Device Ops.
- Record reference — the stable name to give another person: PO, SO, invoice, or manifest number. “The phone screen” is not enough.
- Status bar — tells you what has already happened. A status is not an instruction to click every remaining stage.
- Action buttons — change the record. Read the full label and any confirmation before clicking.
- Smart buttons — open linked records such as Invoices, Manifests, Purchase Order, or Devices. Use these instead of creating replacements.
- Tabs — organize lines, details, and exceptions. Review the rows, not only the header.
- Chatter / history — records system messages, warnings, and who did what. Read the latest warning before retrying an action.
Save is not the same as Confirm
Save keeps the data you entered. Confirm, Complete Receipt, Complete Delivery, and Mark as Paid perform business actions. Review first; do not click a business action just to see what happens.
2 — Use linked records, not duplicates
When you need the document that came before or after the current record:
- note the current record reference;
- use its smart button or linked field;
- confirm the customer/vendor and quantities match; and
- return with the breadcrumb or browser back action.
Do not create a second PO, SO, invoice, or manifest because a linked record is hard to find. Use Troubleshooting and send both references to support.
3 — Set up the physical scanning station
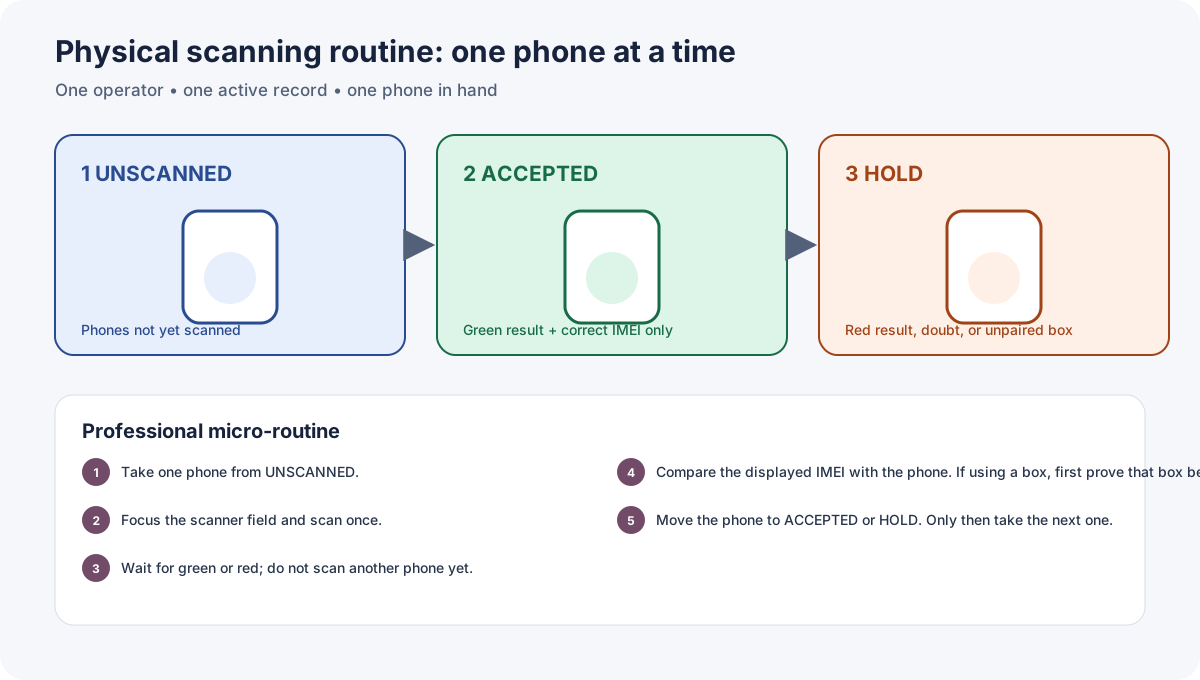
Before scanning, label three physical areas: UNSCANNED, ACCEPTED, and HOLD. Use one operator, one active Odoo record, and one phone at a time.
- Take one phone from UNSCANNED.
- Put the cursor in the scanner field and scan once.
- Wait for the full green or red result. Do not scan the next phone yet.
- Compare the IMEI shown by Odoo with the phone in your hand.
- Green + correct IMEI → move it to ACCEPTED. Red, doubt, or mismatch → move it to HOLD and read the reason.
A box label is safe only when you have verified that the box belongs to that exact phone. When in doubt, read the IMEI from the phone itself.
4 — Know these words
| Odoo word | Plain meaning |
|---|---|
| IMEI | The unique 14–16 digit identifier for one physical phone |
| PO / Purchase Order | What Reyder expects to buy or receive |
| SO / Sales Order | What Reyder promised the customer |
| Receiving Manifest | The Odoo record proving which IMEIs arrived |
| Delivery Manifest | The Odoo record proving which inventory IMEIs left |
| Selling As | Which condition source the customer is buying: supplier/PO intake or Reyder QC |
| Allocation / reserved phone | A specific IMEI held for one SO |
| Smart button | A count/button near the top that opens a linked record |
| Chatter | The message and audit history at the bottom/right of a record |
5 — Practice before sign-off
In the training database, your trainer should ask you to:
- open a record and read back its company, reference, and status;
- open a linked record with a smart button and return safely;
- explain the difference between Save and a completion action;
- perform one accepted scan and one rejected scan using the three physical zones; and
- show what exact information you would send support.
When you can do those five things without prompting, continue to the 15-minute Quickstart.